![]()
WP Estimation & Payment Forms Builder
This awesome plugin allows you to create easily flat visual forms of cost estimation and payment.
Thank you for purchasing my plugin. If you have any questions that are beyond the scope of this help file, please feel free to email via my user page contact form here. Thanks so much!
| Author: | Loopus |
| Item website : | http://codecanyon.net/user/loopus#contact |
Installation How to Install the plugin
1. Install Plugin
Here's a brief information about how to install this plugin
Simply upload the file "WP_Estimation_Form.zip" from the plugins panel of Wordpress then activate it clicking the link "Activate" under the name of the plugin.
Use How to use the plugin
2. Use the plugin
Here's a brief information about how to use this plugin
In the menu, click the link "E& P Forms Builder".
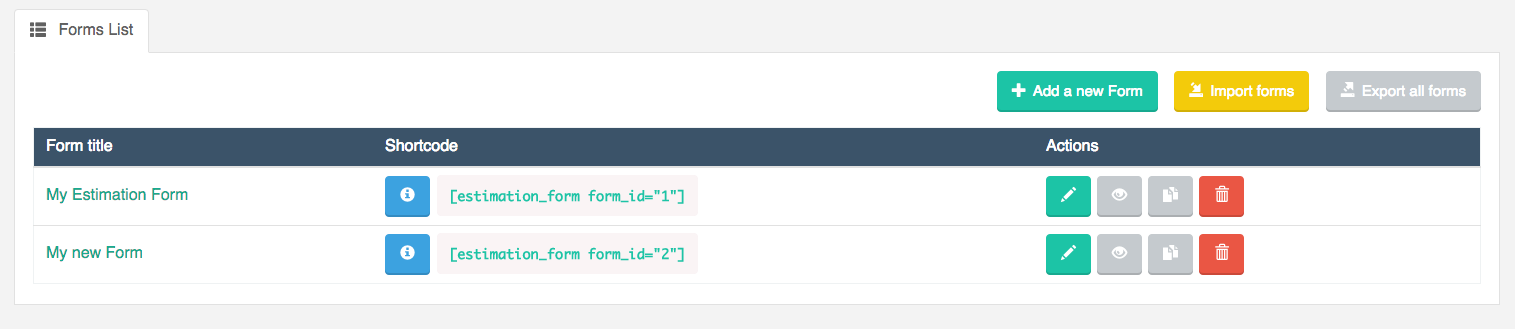
This is the forms list. You can import existing form datas clicking the button "Import forms", or create a new form clicking the "New Form" button .
To edit an existing form, simply click the pencil icon in the row of the wanted form.
Here is the form view :
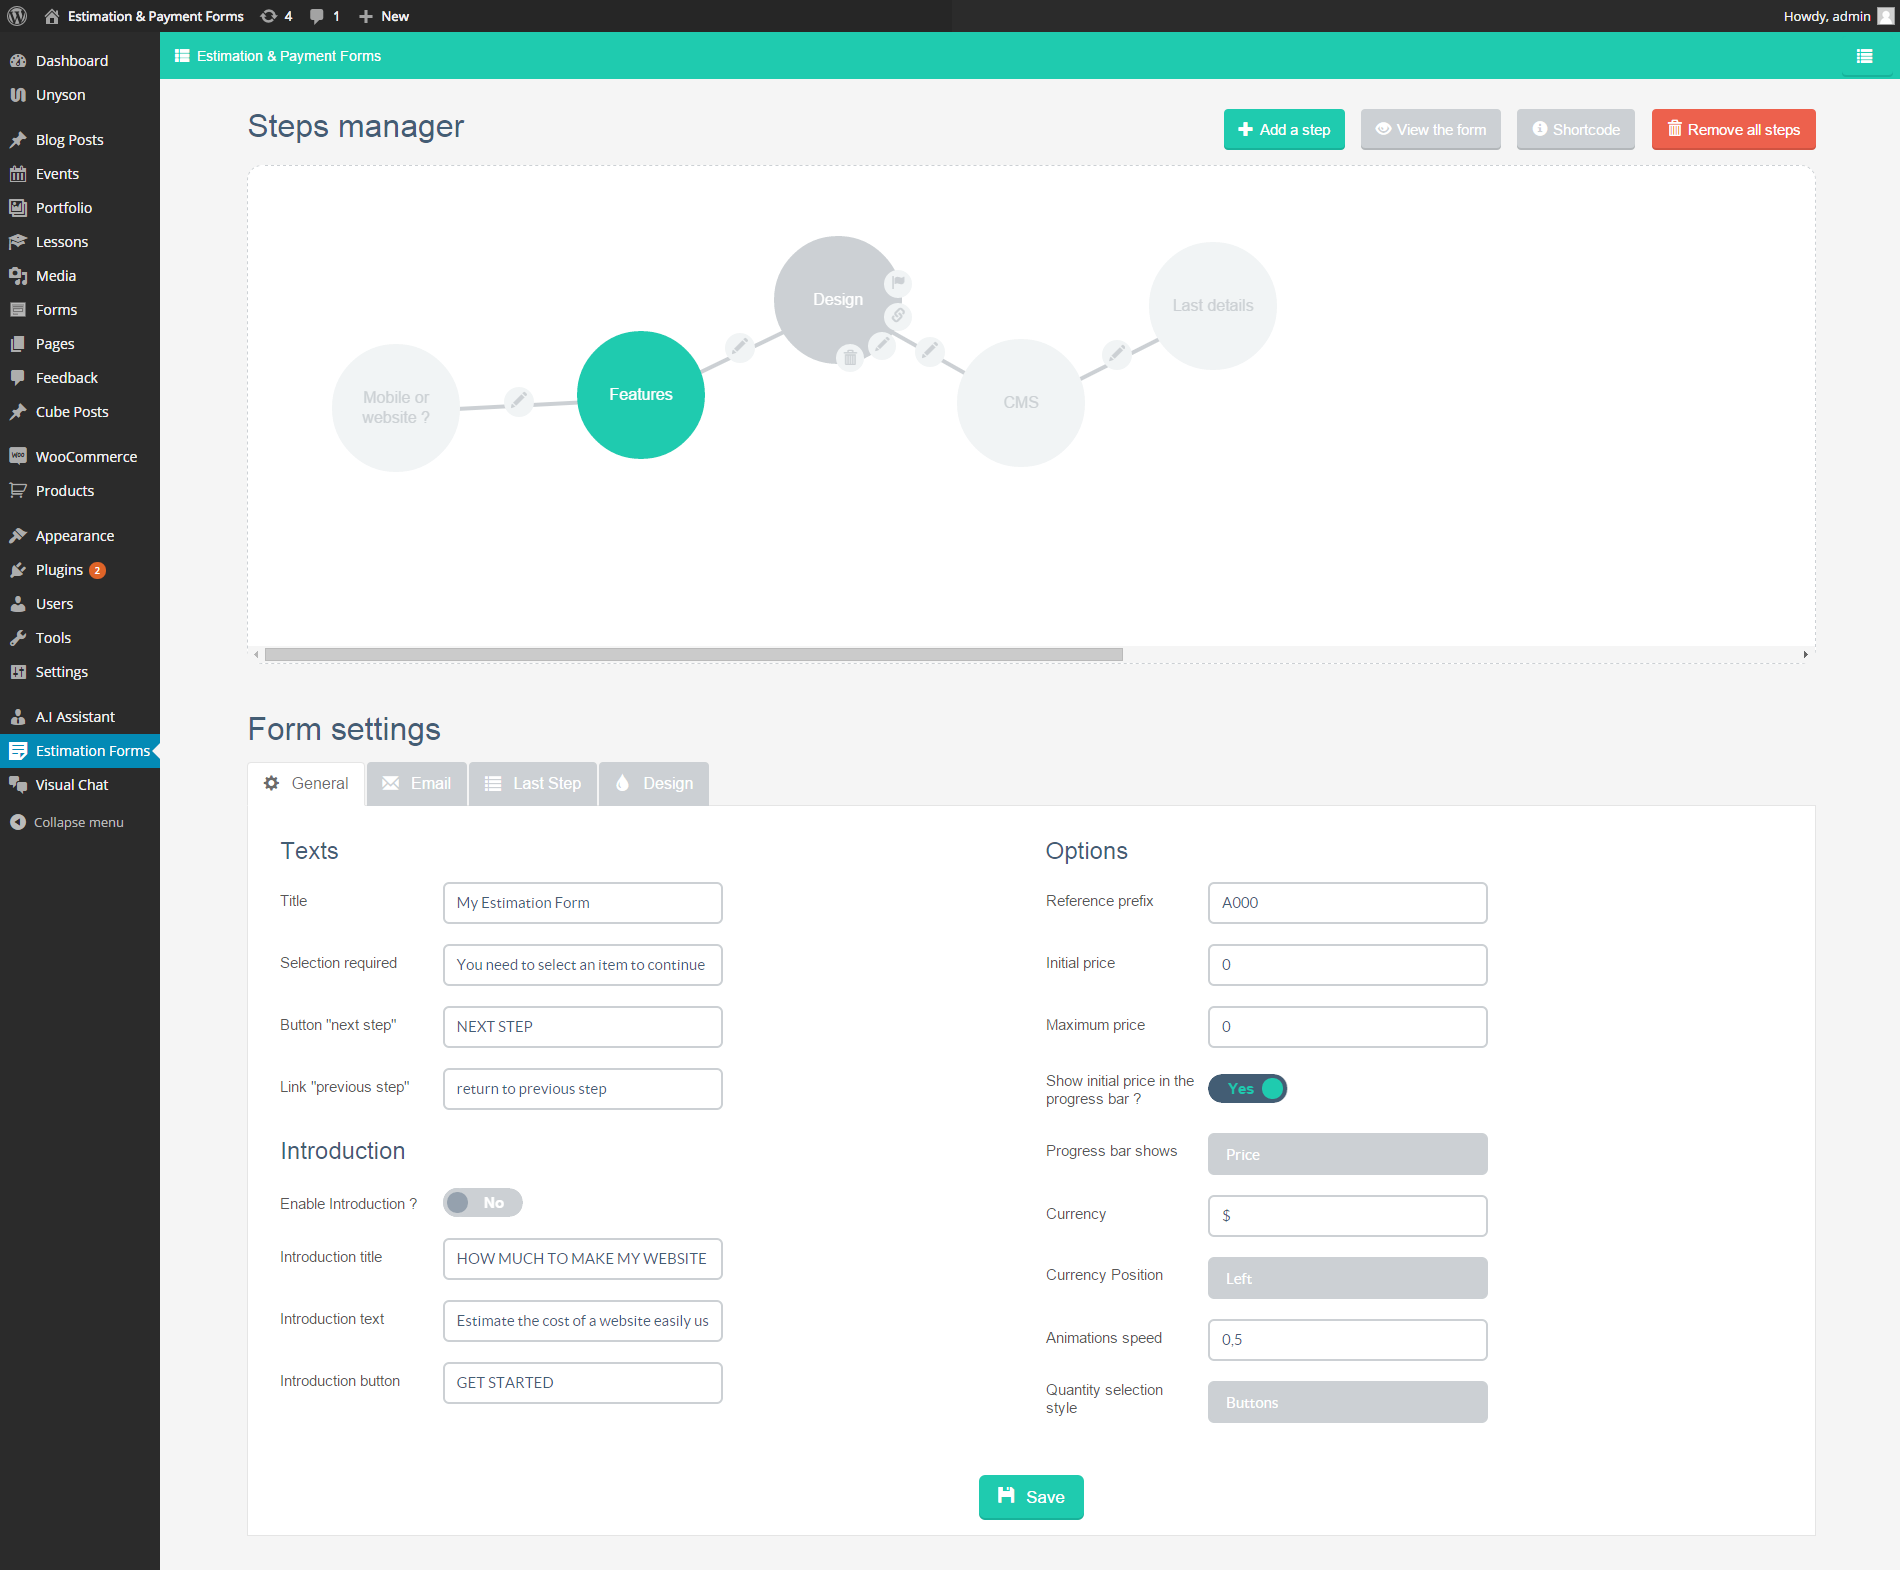
In the Step manager part, you can visualize each step composing your form.
In the Form settings part, you can edit all details and options of your form. To get more information on a field, simply move your mouse over it to show an informative tooltip.
- "General" tag shows all the main texts and options of the current form
- Clicking the "Email" tab, you can edit the email templates and choose to send a confirmation email to the customer.
- The "Discount coupons" tab allows you to manage reductions codes for your form.
- The "Last Step" tab allow you to manage the payment methods, texts, options and fields of the last step of the form.
If you have Gravity Form installed, you can choose to assign a Gravity form to this final step. In this case, the form will be submitted directly by Gravity. - From the "Design" tab, you can change the colors of the form and manage the design options.
Simply move the cursor over an option to see a tooltip giving more informations on it.
To create a step, simply click on the "Add a step button".You will see it appears on the step manager preview panel.
To edit a step a step, move your mouse on the step circle, and click on the pencil icon.

Here is the step view :
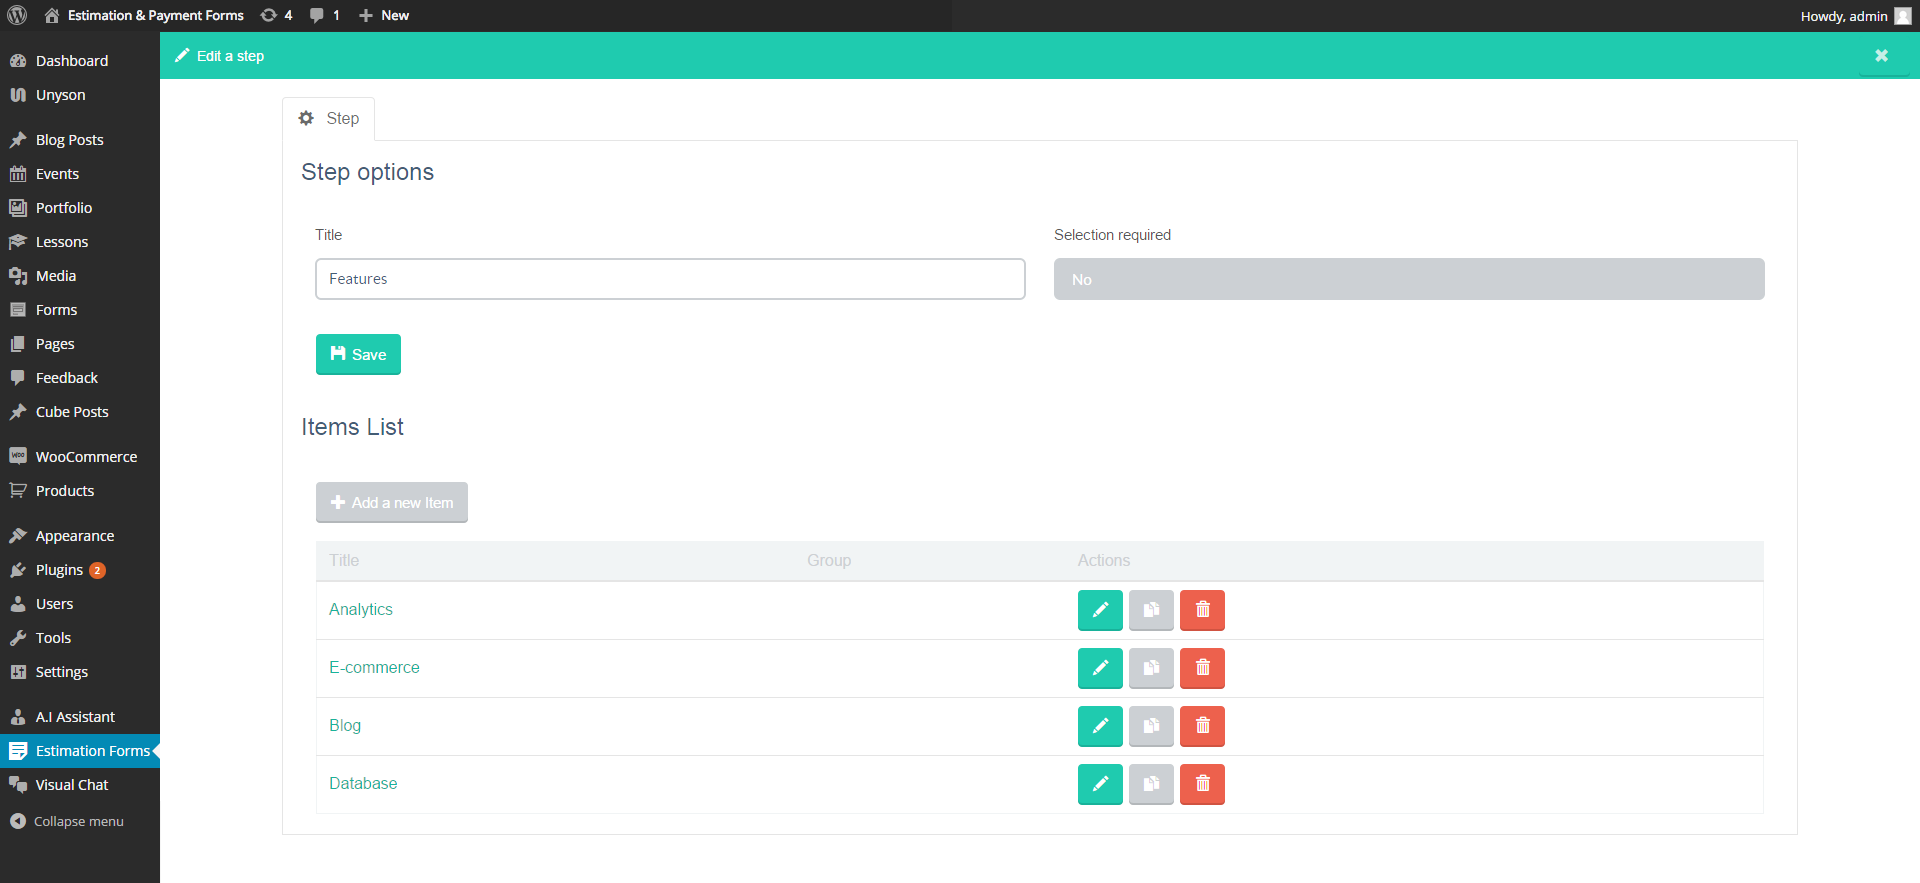
From here, you can edit the step options and manage the items contained in this step. You can sort your items using drag&drop in the list.
On the step view, click on the "Add a new item" button to create a new element in this step.
Here is the item view :
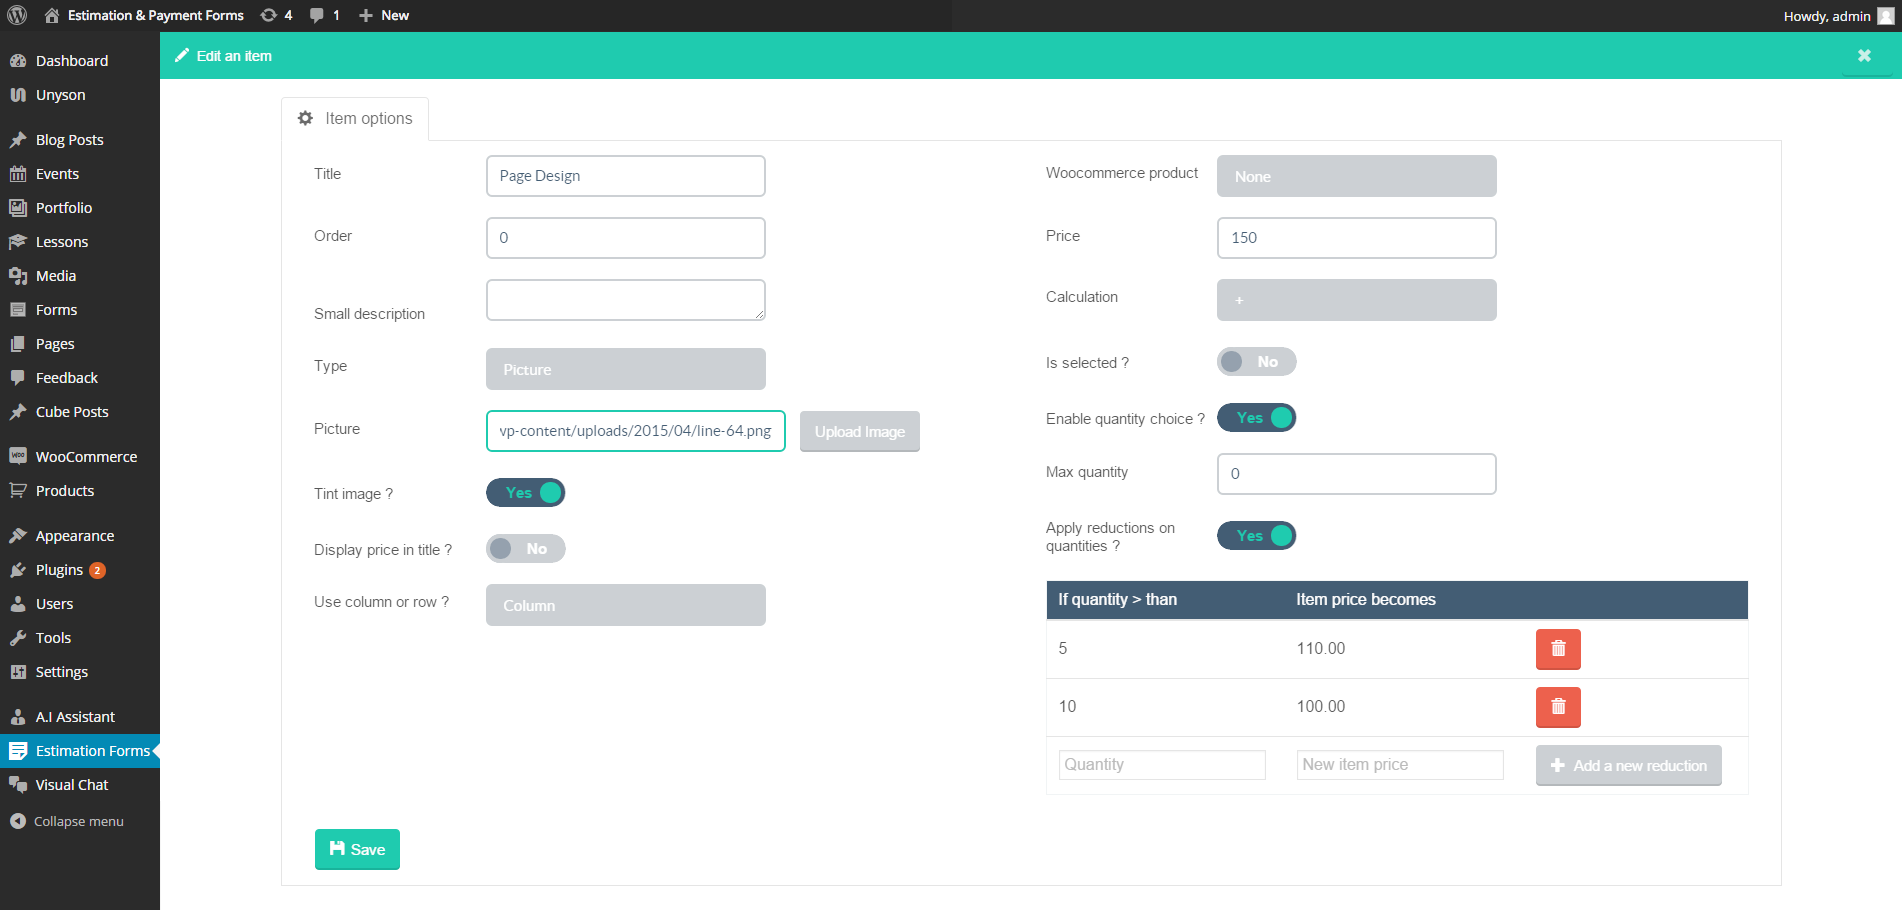
You can freely edit your element from here, choose its type (picture, checkbox, text field etc...) and its options .
To get more information on a field, simply move your mouse over it to show an informative tooltip.
On the form view, if you have more than one step, move your mouse on a step, and click on the "link" icon :
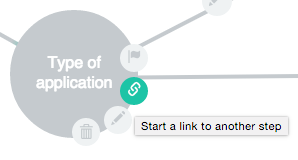
Then click on a second step to create the link.
Now, when the customer will click on the "Next step" button, it will be redirected to the second choosen step.
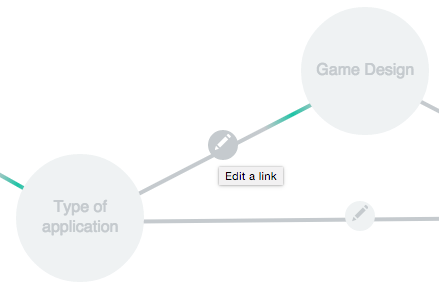
But you can also link a step to several other steps, and add conditions for each link.
To edit a link a add conditions, click on the link pencil icon :
Here is the link view :
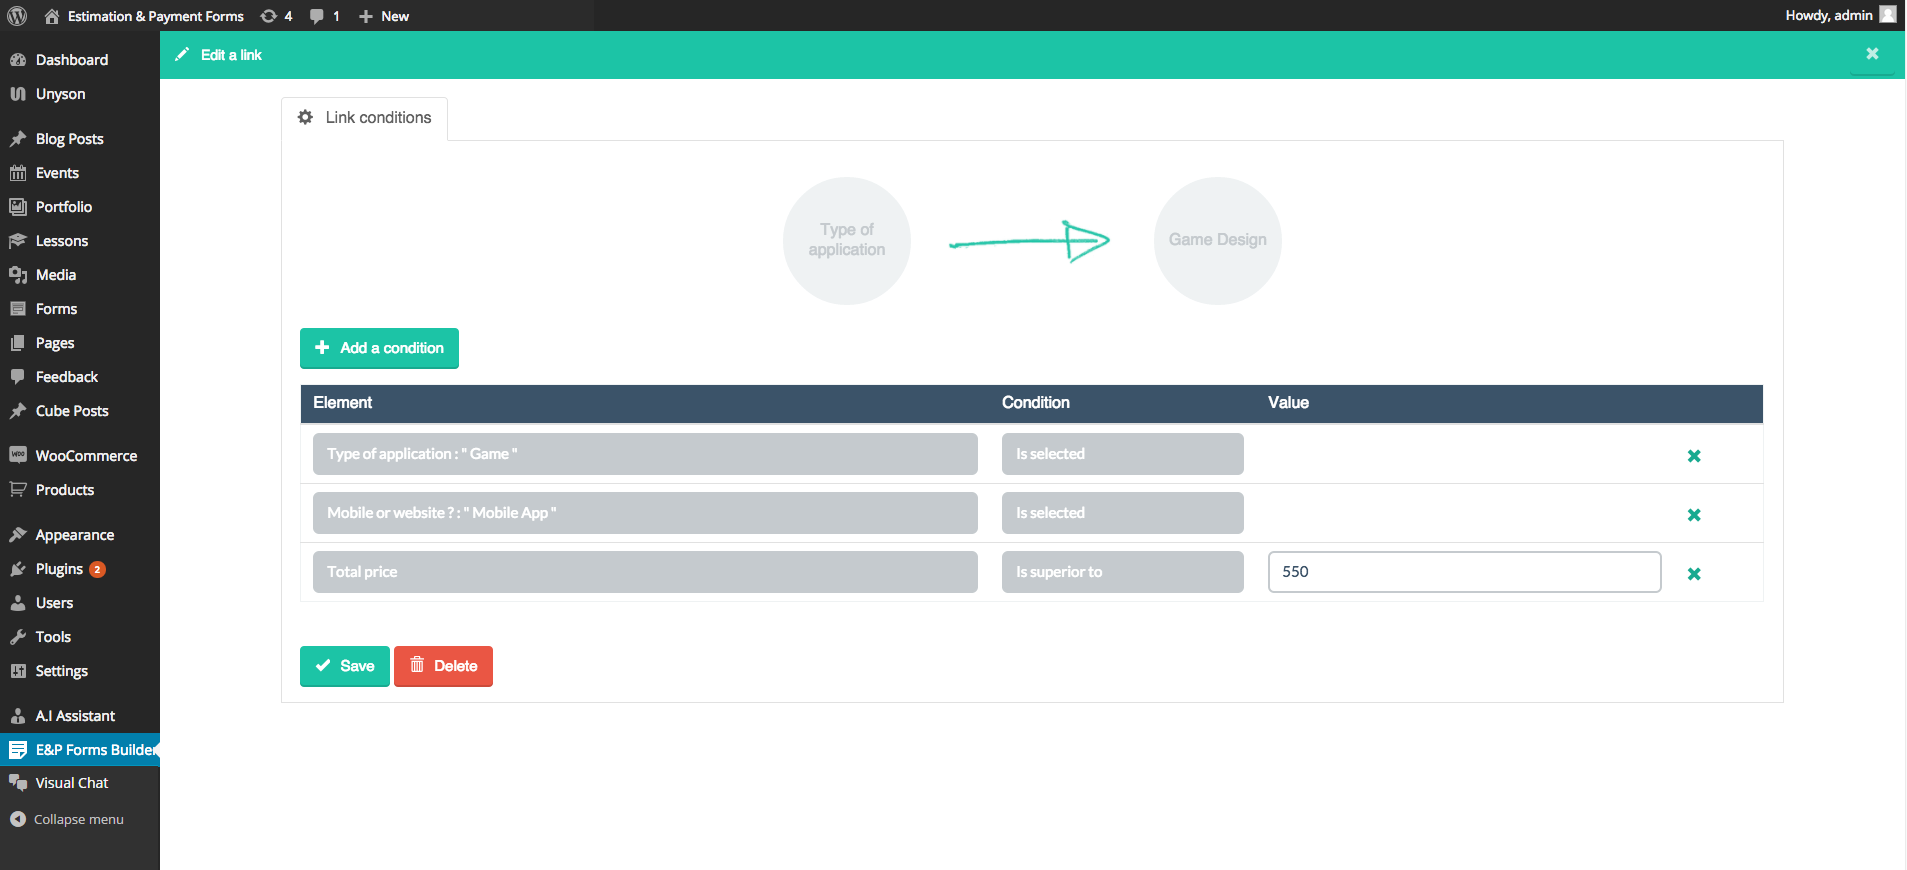
If you add conditions to a link, the linked step will be called only if all defined conditions are filled.
To add a new condition, simply click on the "Add a condition" button.
In the first field, you must select an element. It can be any item from any step, or the current total price .
Choose a condition using the second field. When a condition need a value (ex: price is superior to), you will see a third field to fill the value.
To use the form on a page, simply add the form shortcode on the desired page content .
To see shortcode of a form, click on the information icon, in the "Shortcode" column of the form lists :
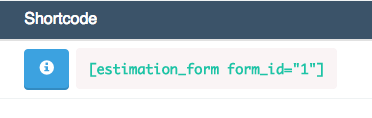
You will see the shortcode information popup :
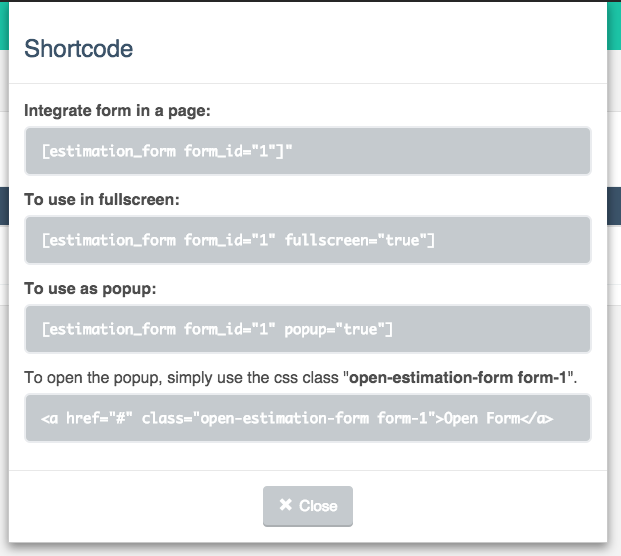
[estimation_form form_id="1"]
To show it as popup, simply add the option popup="true" in the shortcode.
Example : [estimation_form form_id="1" popup="true"]
To show the popup, simply add the class "open-estimation-form form-[the-form-id]" to the desired link / buton.
Example :
<a href="#" class="open-estimation-form form-1" >Open Form<a>
If you are using WooCommerce, you can assign a product of your catalog to an item, from the item view.
Information of the item will be filled automatically, and you can change the title and the picture if you want.
From the form settings, you can enable the option to add selected products to cart or not.
If you activate this option, only woo products can have prices in the form (other items can be used for conditions and informations), because the woo cart will use directly the price defined from woocommerce.
If you are using Gravity forms, you can assign a gravity form on the last step :
- Create a new gravity form, and add a "Paragraph text" field with custom css class (in the field advanced tab) "estimation_project".
This field will be hidden and used to recover the final selection detail. - Create a new gravity form, and add a "Number" field with custom css class (in the field advanced tab) "estimation_total".
This field will be hidden and used to recover the final total price. - Continue to create your form, without worrying about styles.
- Then, go to the form settings, on "Last Step" tab, and select the created form in the "Use Gravityform" field .
To make a payment at end of the form, simply activate the "Use paypal payment" or "Use stripe payment" option in the "Last Step" settings tab of your form.
Then fill the corresponding fields with your paypal email or stripe keys .
Using paypal, at the end of the form, the user will be redirected to the paypal payment page.
Using Stripe, the form will ask form credit card informations in the last step to make the payment.
Automatic Updates
To apply an automatic update, click on the Dashboard > Updates menu link in the WP menu, then select the plugin in the list and click the "Update plugins" button to apply the update.
Manually apply an update
To manually apply an update, simply replace the files of the plugin using ftp.
The path is :
/wp-content/plugins/WP_Estimation_Form .
3. Custom calculations
How to use custom and distance calculations
To use a custom calculation instead of a static price of an item, edit this item and activate the option "Use custom calculation".
You will see the custom calculation panel :
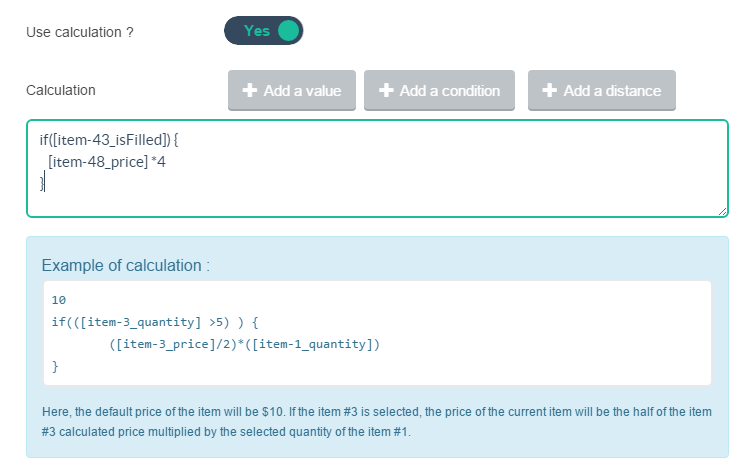
The calculation code uses Javascript, you can use any javascript function inside. The result of the calculation filled in the field will define the price of the current item.
If the item uses quantities, this result price will be multiplied by the selected quantity.
Above the calculation field, you can see 3 buttons :
- Add a value : this button allows you to easily recover the value of any item in your form. Simply click the button, select the desired item and the wanted attribute (price, quantity ...) and press the "Insert" button. You will see the generated code directly in the calculation field.
- Add a condition : clicking this button, you can visually define conditions (as on a link) using the items of your form. The generated code of the condition will be added in the calculation field at end. The calculation you will add between the two "{" and "}" of the created condition will be used in calculation only if the condition is filled.
- Add a distance : this button will be enabled only if you filled the "Google Maps browser key" (in the "General" tab of the form) is filled. Clicking this button, you can add a distance depending on different textfields of your form (addresses, cities, countries ...) to your custom calculation. More information at point 3.2 .
The 4 usual calculation operators are + (add up), - (subtract), * (multiply) and / (divide) .
Example of calculation :
([item-1_quantity]*10)/2
Click here to watch a video tutorial showing how to use custom calculations
To use distance calculations in your form, you first need to fill the "Google Maps browser key" with a valid key. To get a browser javascript API key for Google Maps, please follow this link : https://developers.google.com/maps/documentation/javascript/get-api-key?hl=en
As mentioned in the previous paragraph, you can use distance calculations in your custom calculations. You can also use it as quantity, enabling the "Use distance as quantity ?" option on an item.
In this second case, the calculated distance will be automatically defined as quantity on this item (this automatic quantity can't be modified by the customer).
Here is the distance calculation panel you can see clicking the "Add a distance" button in a custom calculation, or the "Configure distance" button of the "Use distance as quantity ?" option :

Simply select the corresponding fields (textfields and selects) of your form on each dropdown for departure and arrival addresses. If a field doesn't exist in your form, you can simply leave the dropdown value to "Nothing".
Then choose if the result must be generated in km or miles and click the "Insert" button to finish.
The distances are calculated by Google Maps for a normal vehicle, taking into account the real path taken.
If the distance can't be calculated by Google Maps, an error message will be displayed (you can edit it from the "Texts" tab) and the next step button will be hidden, so that the user can't continue the form without correcting the filled fields.
Once again, thank you so much for purchasing this plugin. As I said at the beginning, I'd be glad to help you if you have any questions relating to this plugin. No guarantees, but I'll do my best to assist. If you have a more general question relating to the themes on Codecanyon, you might consider visiting the forums and asking your question in the "Item Discussion" section.